Shock Chlorination: How to Disinfect Your Well
📋 In This Guide
When to Shock Chlorinate Your Well
Shock chlorination isn't something you do on a casual schedule. It's a targeted intervention used when specific conditions demand it. Understanding when — and when not — to treat your well can save you time, money, and frustration.
Situations That Require Immediate Treatment
- Positive bacteria test results. If your water sample shows total coliform bacteria or E. coli, disinfection is urgent. E. coli in particular indicates fecal contamination and poses serious health risks including gastrointestinal illness, especially for children, elderly, and immunocompromised individuals. Don't wait — treat immediately and investigate the contamination source.
- After a new well is drilled. All newly constructed wells contain bacteria introduced during the drilling process. California's well construction standards (California Well Standards Bulletin 74-90) require disinfection as part of the well completion process before the water is used for domestic purposes.
- After pump repair or replacement. Every time the well is opened and equipment is lowered into or removed from the casing, there's potential for introducing surface bacteria. Licensed C-57 contractors in California are required to disinfect after well work, and most responsible homeowners should as well.
- After flooding or suspected surface water intrusion. Southern California's periodic heavy rains — especially during El Niño years — can overwhelm poorly sealed wellheads. If you experienced flooding near your well, or if your well is located in a low-lying area that was inundated, shock chlorination should be your first step after the water recedes.
- After a contamination event. Nearby septic system failure, chemical spill, or agricultural runoff that may have reached your aquifer all warrant immediate disinfection and comprehensive water testing.
Recommended (But Not Always Required)
- Annual preventive maintenance. In areas with shallow water tables, agricultural activity, or a history of bacterial issues, annual shock chlorination can be an effective preventive measure. Many San Diego County well owners in areas like Valley Center, Ramona, and Fallbrook treat annually as insurance.
- After prolonged non-use. Vacation homes, seasonal properties, and wells on undeveloped land that sit idle for months develop stagnant water columns where bacteria can flourish. If a well hasn't been run in 30+ days, consider shock chlorination before using the water for drinking.
- Iron bacteria or sulfur bacteria symptoms. Orange/brown slime in toilet tanks, rotten egg odors, or slimy buildup on fixtures indicate bacterial colonies that benefit from periodic shock treatment.
- New homeowner due diligence. When you buy property with a private well, you have no way of knowing the well's maintenance history. A shock chlorination plus comprehensive water test gives you a clean baseline.
- After nearby construction or earth-moving. Grading, excavation, or trenching near your well can disturb the soil around the casing and potentially compromise the surface seal, creating new pathways for contamination.
When Shock Chlorination Is NOT the Answer
Chlorination is powerful but it's not a cure-all. In these situations, you need to address underlying issues first:
- Known structural defects. If the well casing is cracked, the sanitary seal has failed, or the well cap is damaged, chlorination will provide temporary relief but bacteria will return within days to weeks. Fix the structural problem first, then disinfect.
- Active contamination source. A failing septic system 50 feet from your well, surface water flowing directly toward the wellhead, or a nearby animal feeding operation — these ongoing contamination sources will overwhelm any one-time treatment.
- Chemical contamination. Chlorine kills microorganisms. It does nothing for nitrates, arsenic, uranium, PFAS, pesticides, or volatile organic compounds. If you're dealing with chemical contamination, you need specific treatment systems (reverse osmosis, activated carbon, ion exchange) rather than chlorination.
- Severely encrusted or fouled wells. Wells with decades of mineral buildup or heavy iron bacteria colonization may need mechanical rehabilitation (wire brushing, jetting, surging) before chlorination can be effective. The biofilm and mineral deposits shield bacteria from chlorine contact.
California Well Disinfection Regulations
California has some of the most comprehensive private well regulations in the country. If you own a well in San Diego County, Riverside County, or anywhere in the state, here's what you need to know about the legal requirements around well disinfection:
State Requirements (DWR Bulletin 74-90)
The California Department of Water Resources' Well Standards (Bulletin 74-90 and its supplement 74-81) establish minimum requirements for well construction and maintenance statewide. Key disinfection requirements include:
- New well construction: All newly constructed wells must be disinfected before being placed into service. The well driller is responsible for this step and must document it on the well completion report filed with DWR.
- After well repair or modification: Any work that involves opening the well or introducing equipment into the casing requires post-work disinfection. This includes pump replacement, casing repair, well deepening, and rehabilitation work.
- Minimum chlorine concentration: State standards call for a minimum of 50 mg/L (50 ppm) free chlorine throughout the well for at least 2 hours contact time. Most professionals target 100–200 ppm for better reliability.
San Diego County Requirements
San Diego County's Department of Environmental Health (DEH) enforces additional requirements for private wells:
- Wells used for domestic water supply must produce bacteriologically safe water. If bacteria is detected, remedial action (which typically means shock chlorination and source identification) is required.
- Property transactions involving well water often trigger a DEH water quality clearance that requires a passing bacteria test.
- The county maintains records of well permits, inspections, and water quality complaints that can provide historical context about your well.
Riverside County Requirements
Riverside County Environmental Health regulates private wells similarly. Wells in the Anza, Aguanga, and Sage areas — where SCWS services many clients — must meet county water quality standards, and shock chlorination is the standard remedial response to positive bacteria tests.
Real Estate Transactions
If you're buying or selling a property with a private well in California, the well water quality is typically inspected as part of the transaction. A positive bacteria test can delay or complicate a sale. Shock chlorination with a clean follow-up test is usually sufficient to satisfy buyer and lender requirements, but persistent contamination may require well repairs, a continuous disinfection system, or even a new well.
What You'll Need
Choosing Your Chlorine Source
The disinfecting agent you choose matters more than most people realize. Here's a detailed comparison:
- Unscented household bleach (8.25% sodium hypochlorite) — The most accessible and widely recommended option. Available at any grocery store. Make sure it says "sodium hypochlorite 8.25%" on the label. Older bleach formulations were 5.25%, so if you're using an older reference guide, you may see different dosage recommendations. Always check the actual concentration on the bottle.
- Check the expiration date. Liquid bleach degrades over time — sodium hypochlorite slowly breaks down into salt and water. Bleach older than 6 months may have significantly reduced strength. Bleach stored in heat (a garage in a San Diego summer) degrades even faster. If you're not sure about your bleach's potency, buy a fresh bottle for the job.
- Calcium hypochlorite granules (pool shock) — Available at pool supply stores, typically 65–73% available chlorine. Advantages: longer shelf life than liquid bleach, more concentrated so you need less product. Disadvantages: must be pre-dissolved in water (undissolved granules can damage pump components), and you need to carefully calculate the dosage based on the specific product concentration.
- Avoid these products entirely: Scented bleach (fragrances contaminate your water), splashless or no-splash formulas (contain thickening agents that reduce chlorine concentration), color-safe bleach (uses hydrogen peroxide, not sodium hypochlorite), and bleach with added cleaners or surfactants (introduce chemicals into your water supply).
Equipment Checklist
- Clean 5-gallon bucket — For mixing the bleach solution. Use a dedicated bucket that hasn't contained any other chemicals.
- Chemical-resistant rubber or nitrile gloves — Standard kitchen dishwashing gloves work in a pinch, but chemical-resistant gloves are more durable and provide better protection.
- Splash-proof safety goggles — Not regular glasses. You need goggles that prevent splash from reaching your eyes. Bleach in the eyes is a medical emergency.
- Garden hose (50–100 feet) — Long enough to reach from an outdoor faucet back to the well. You'll also need this for flushing.
- Wrench set — For removing the well cap bolts. Most sanitary caps use 1/2" or 9/16" hex bolts.
- Flashlight — Essential for inspecting the well casing while the cap is off. This is your opportunity to check for visible problems.
- Chlorine test strips — Available at pool supply stores or online. These confirm that chlorine has reached all fixtures and verify that it's fully flushed before you resume drinking the water. Target accuracy: 0–200 ppm range.
- Notebook and pen — Document what you find when you open the well cap, and record any observations. This information is valuable if you need professional follow-up.
Safety Gear
- Chemical-resistant rubber gloves (chlorine causes skin burns at high concentrations)
- Splash-proof safety goggles (not just glasses)
- Old clothes you don't mind getting bleach spots on
- Work in a well-ventilated area — if your wellhead is in an enclosed pump house, open all doors and windows
- Have a garden hose or bucket of clean water nearby for emergency skin/eye flushing
Calculate Chlorine Amount
Target Concentration
The goal is to achieve 100–200 parts per million (ppm) of free chlorine throughout the well water column. At this concentration, chlorine effectively kills coliform bacteria, E. coli, and most other common well contaminants within 2–12 hours of contact time.
The standard rule of thumb: 2 gallons of household bleach (8.25% sodium hypochlorite) per 100 gallons of well water.
For calcium hypochlorite granules (65% available chlorine): use approximately 2 ounces per 100 gallons of well water.
Estimate Well Water Volume
You need to know your well's casing diameter and the depth of standing water (total well depth minus static water level). If you don't have this information, check your well completion report — searchable through California DWR's online database — or contact a well contractor.
| Well Diameter | Gallons per Foot | 100 ft of Water |
|---|---|---|
| 4 inch | 0.65 gallons | 65 gallons |
| 5 inch | 1.0 gallons | 100 gallons |
| 6 inch | 1.5 gallons | 150 gallons |
| 8 inch | 2.6 gallons | 260 gallons |
| 10 inch | 4.1 gallons | 410 gallons |
| 12 inch | 5.9 gallons | 590 gallons |
Don't Forget Your Distribution System
The well water volume is only part of the equation. You also need to disinfect the water in your:
- Pressure tank: A standard 80-gallon pressure tank holds approximately 25–35 gallons of actual water (the rest is air). A 40-gallon tank holds about 12–18 gallons.
- Water heater: 40–80 gallons depending on size. This is a significant volume that many homeowners forget to account for.
- Household plumbing: A typical home has 5–15 gallons of water sitting in pipes at any time. Larger homes or properties with extensive outdoor plumbing may have more.
Example Calculation
Well: 6-inch casing, 200 feet deep, static water level at 50 feet
Water depth: 200 − 50 = 150 feet
Well water volume: 150 × 1.5 = 225 gallons
Pressure tank: ~30 gallons
Water heater: ~50 gallons
Plumbing: ~10 gallons
Total system volume: 225 + 30 + 50 + 10 = 315 gallons
Bleach needed: 315 ÷ 100 × 2 = 6.3 gallons (round up to 7 gallons)
When in Doubt, Use More
Extra chlorine won't damage your well, pump, or plumbing. It will simply take longer to flush out. Insufficient chlorine, however, means you've invested hours in a treatment that may fail — requiring you to repeat the entire process. If you're uncertain about your well's volume, round up generously.
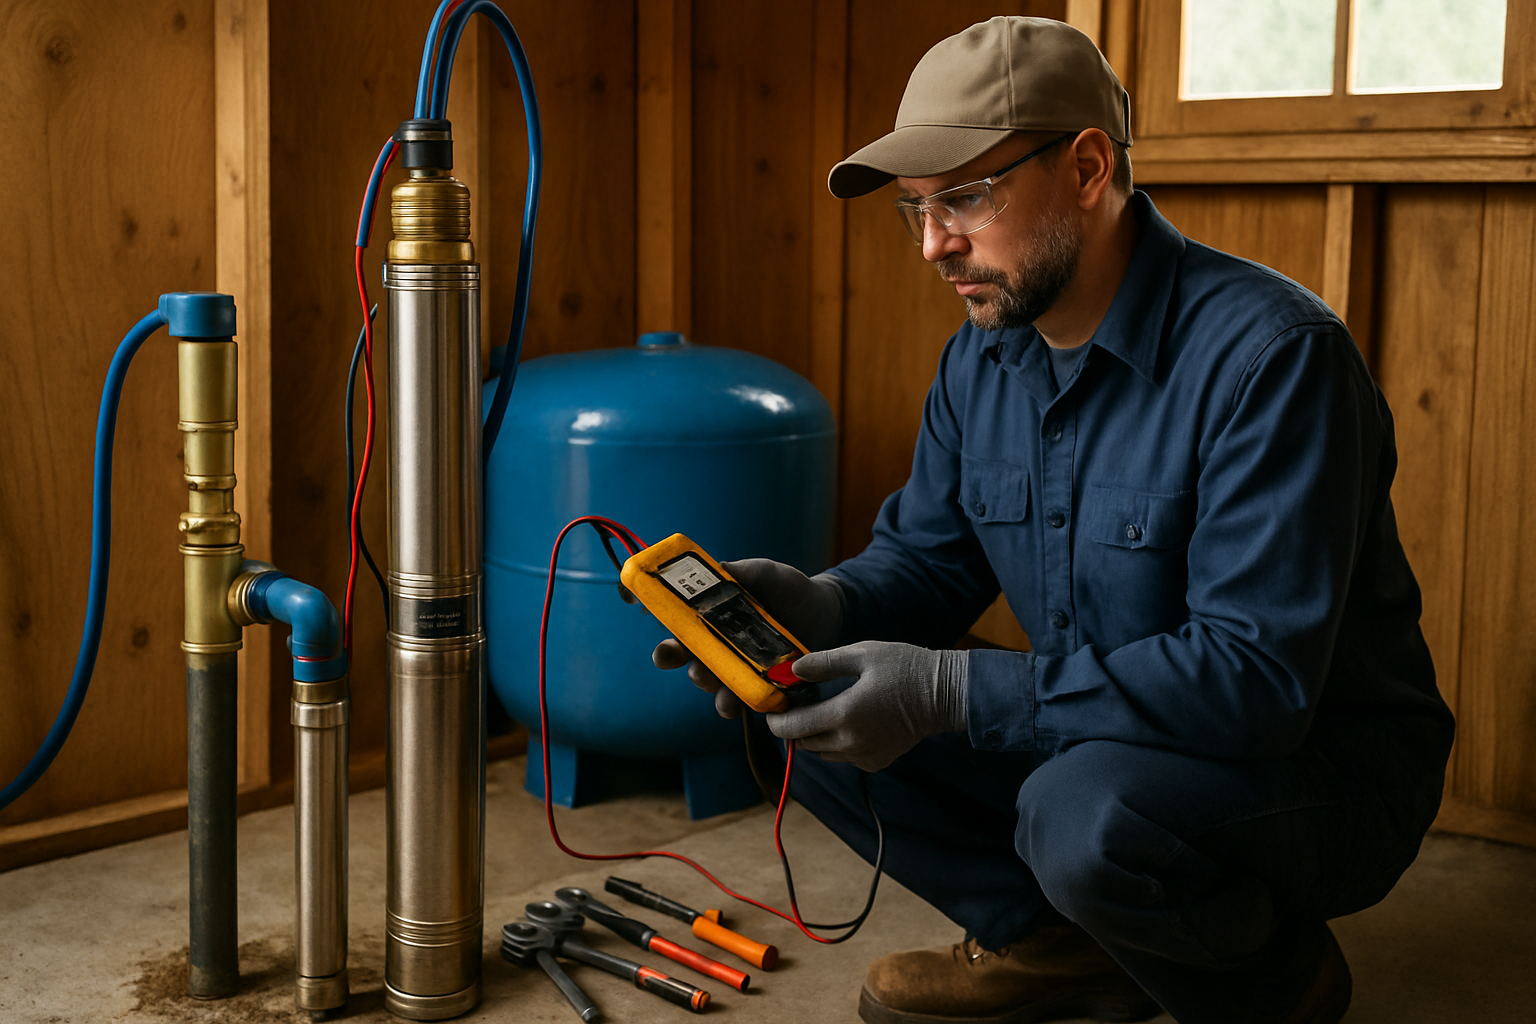
Step-by-Step Process
Step 1: Preparation (30 minutes)
- Turn off the water heater. Electric: flip the dedicated breaker. Gas: set to "pilot" or "vacation" mode. Heating highly chlorinated water is unnecessary and accelerates corrosion of the anode rod.
- Bypass all water treatment equipment. This means water softeners (put in bypass mode), carbon filters (remove cartridges or bypass the housing), reverse osmosis systems (close the feed valve), UV sterilizers (disconnect or bypass). High chlorine concentrations destroy carbon media, damage softener resin, and can fog UV sleeves.
- Prepare the chlorine solution. Mix your calculated amount of bleach with 3–5 gallons of clean water in your bucket. Always add bleach to water, not water to bleach — this minimizes splashing and fume generation.
- Turn off the well pump at the circuit breaker. Label it clearly so no one turns it back on unexpectedly.
- Remove the well cap carefully. While it's off, use your flashlight to inspect the inside of the casing. Look for: spider webs or insect nests (indicating the cap wasn't sealed properly), rust or corrosion on the casing, standing water above the pitless adapter (could indicate a surface drainage problem), any signs of animal intrusion.
Step 2: Add Chlorine to the Well (15 minutes)
- Pour the chlorine solution directly into the well casing. Pour slowly and carefully — the opening may be narrow (especially on 4-inch wells). Use a funnel if needed.
- Wash down the inside walls of the casing with the chlorine solution or with a separate bucket of chlorinated water. Biofilm adheres to the casing walls above the water line, and simply pouring chlorine into the water below won't reach it. A long-handled brush (a toilet brush zip-tied to a PVC pipe extension works great) can help physically dislodge biofilm.
Step 3: Recirculate (30–60 minutes)
- Turn the pump power back on.
- Attach a garden hose to your nearest outdoor spigot. Run the other end back to the well and insert it into the casing.
- Turn on the spigot and let water recirculate for at least 30 minutes — 60 minutes is better. This step is critical. The water flows from the well, through the pump and pressure system, out the spigot, through the hose, and back into the well — thoroughly mixing the chlorine throughout the water column. Use the hose spray to wash down the inside casing walls as well.
- Periodically check the recirculating water. You should be able to smell a strong chlorine odor. If the smell fades or disappears during recirculation, you may need to add more bleach — especially in wells with high organic content or iron that consume chlorine rapidly.
Step 4: Circulate Through All Household Plumbing (30–45 minutes)
- Remove the hose from the well.
- Open each cold water faucet in the house, one at a time. Run until you detect a clear chlorine smell, then close that faucet and move to the next. Start with the faucet closest to where the water enters the house and work outward to the most distant fixture.
- Open each hot water faucet until chlorine is detected. This fills the water heater tank with chlorinated water — a step many homeowners skip, which leaves a 40–80 gallon reservoir of potentially contaminated water in the system.
- Flush every toilet once. The tank and bowl need to fill with chlorinated water.
- Run outdoor spigots and hose bibs until chlorine is detected.
- Run a short cycle in the washing machine and dishwasher to chlorinate those internal supply lines.
- Close all faucets and fixtures. Every water outlet in the house should now have chlorinated water sitting in the line leading to it.
Step 5: Contact Time (12–24 hours)
- Replace the well cap securely. Make sure all bolts are tight and the gasket is properly seated.
- Let the chlorinated water sit for a minimum of 12 hours. 24 hours is significantly better, especially for iron bacteria. The longer the contact time, the more effective the treatment.
- Do not use any water during the contact period. Plan ahead — fill containers, coolers, and water bottles with clean water before you start. Schedule the treatment around a day when you can leave the house or have an alternative water source.
- If weather is hot (common in Southern California), the chlorine will degrade faster. Consider timing your treatment for cooler weather or extending the contact period.
Step 6: Flush the System (1–4 hours)
- Connect a garden hose to an outdoor spigot and direct the flow away from landscaping, gardens, septic systems, pools, ponds, and storm drains. A gravel pad, bare dirt area, or concrete driveway works well.
- Run the water until you can no longer smell chlorine. This may take anywhere from 30 minutes to 4+ hours depending on your well's flow rate and how much chlorine was used. A well producing 10+ GPM will flush faster than a low-yield well at 2–3 GPM.
- Verify with chlorine test strips. Your nose adapts to chlorine smell faster than you'd think — test strips are the objective measure. Target: 0 ppm free chlorine.
- Then flush all indoor fixtures — run every cold and hot water faucet until chlorine-free. Flush toilets multiple times.
- Drain and flush the water heater by running hot water at a kitchen or bathroom faucet until the chlorine smell is gone.
Step 7: Reconnect and Resume
- Return the water heater to normal operation (flip the breaker back on or turn the gas valve from pilot to normal).
- Reconnect all water treatment equipment. Take softeners off bypass, reinstall carbon filter cartridges, turn on UV sterilizers, and open RO system feed valves.
- Run a softener regeneration cycle if applicable — this clears any residual chlorine from the resin bed.
- Replace carbon filter cartridges if they were exposed to chlorine (even briefly, high concentrations can exhaust carbon media).
Professional vs. DIY Shock Chlorination
Shock chlorination is one of the more DIY-friendly well maintenance tasks, but there are clear advantages to professional service — and situations where professional treatment is the smarter choice.
When DIY Makes Sense
- You know your well's specifications (depth, casing diameter, static water level)
- You've done it before or are comfortable following a technical procedure
- The contamination was likely caused by a one-time event (well work, flooding)
- Your well is in good structural condition (sound casing, proper cap, good surface seal)
- You want to save money — DIY cost is typically under $20 in supplies
When to Hire a Professional
- Repeat contamination: If bacteria keeps coming back after treatment, a professional can diagnose the structural cause — camera inspection, seal testing, casing integrity assessment.
- Unknown well history: Newly purchased properties with no well records, wells of unknown depth or construction, abandoned wells being returned to service.
- Iron bacteria or heavy biofilm: These require enhanced treatment protocols (higher concentrations, longer contact time, physical agitation, potentially acid pre-treatment) that are beyond typical DIY scope.
- Low-yield wells: Wells producing less than 3 GPM require careful management during flushing to avoid running the pump dry and damaging it.
- County health department involvement: If you received a notice from environmental health about your well's water quality, professional documentation of the remediation may be required.
What Professional Service Includes
When SCWS performs a shock chlorination, our service typically includes:
- Pre-treatment water sample collection and lab testing
- Well cap inspection and seal assessment
- Precise chlorine dosing based on measured well volume
- Mechanical agitation and thorough recirculation
- System flushing and verification with calibrated chlorine testing
- Post-treatment water sample collection (7–10 days later)
- Written report documenting the procedure and results
- Recommendations for any well repairs or ongoing treatment needed
After Chlorination: What to Expect
Retest Your Water
- Wait 7–10 days after completing the flush before collecting a follow-up water sample. Testing too soon can produce a false negative — trace amounts of residual chlorine may still be suppressing bacterial growth.
- Test for total coliform and E. coli at minimum. These are the standard indicators of bacteriological safety.
- Collect the sample properly. Use a sterile sample bottle (available from labs), collect from an untreated cold water tap, let the water run for 3–5 minutes first to clear the line, and don't touch the inside of the bottle or cap. Improper sampling technique is one of the most common causes of false positive results.
Normal Post-Treatment Effects
- Slight chlorine taste for a few days — This is normal and will dissipate as you use water. Running a carbon filter (like a Brita pitcher) for drinking water speeds this up.
- Temporary sediment or discoloration — The chlorination process can dislodge mineral deposits and biofilm from pipe walls, resulting in brown, orange, or slightly cloudy water. Run faucets until clear. This typically resolves within hours to a day or two.
- Temporary odor — Some wells experience a brief change in water odor after treatment as disturbed sediment and dissolved minerals resettle. This should resolve within 1–3 days.
Flush Water Disposal
Disposing of chlorinated flush water requires some care in Southern California:
- Do not discharge to your septic system. High-concentration chlorine kills the beneficial anaerobic bacteria your septic tank relies on for waste decomposition. A destroyed bacterial colony can take weeks to re-establish and may cause septic system backup.
- Direct flush water to a gravel pad, bare soil, or hardscape. In San Diego County's semi-arid climate, flush water will typically evaporate or percolate quickly.
- Keep chlorinated water away from fish ponds, swimming pools, landscape plants (especially drought-stressed natives), pets' water bowls, and any surface waterway or storm drain.
- In Riverside County rural areas (Anza, Aguanga, De Luz), discharge to open ground is generally acceptable but avoid any drainage that flows toward a seasonal creek or wash.
Water Testing Protocols for Well Owners
Proper water testing is essential both before and after shock chlorination — and as ongoing maintenance for any private well. Here's what every Southern California well owner should know:
Baseline Testing (Annual Minimum)
- Bacteriological (total coliform and E. coli): Annual testing at minimum. This is the single most important water quality test for private wells and typically costs $25–50 at a certified lab.
- Nitrate: Annual testing, especially in agricultural areas. Elevated nitrate is common in areas with animal operations, fertilizer use, or failing septic systems. San Diego County's inland valleys are particularly susceptible.
- General mineral analysis: Every 3–5 years. This includes hardness, iron, manganese, pH, TDS (total dissolved solids), and other minerals that affect water quality, taste, and equipment longevity.
Extended Testing (When Warranted)
- Arsenic: Naturally occurring in some Southern California groundwater formations. Test if you've never tested or if you're in a known arsenic zone.
- Uranium and radionuclides: Present in granite formations common in San Diego County's backcountry. Test if your well is drilled into granitic rock.
- PFAS (forever chemicals): Emerging contaminant of concern. Test if you're near a military base, airport, or industrial area. March Air Reserve Base in Riverside County has documented PFAS contamination in surrounding groundwater.
- Volatile organic compounds (VOCs): If near agricultural operations, dry cleaners, gas stations, or industrial sites.
Where to Get Testing in San Diego & Riverside Counties
- San Diego County DEH offers bacteria testing for residential well owners
- Certified private labs (such as Eurofins, Pace Analytical, or local ELAP-certified labs) offer comprehensive panels
- Your well contractor can collect and submit samples as part of maintenance service — we handle this for our SCWS clients
If Shock Chlorination Doesn't Work
Bacteria Returns After Treatment
If your follow-up test still shows bacteria, don't panic — but don't ignore it either. Shock chlorination addresses the symptom (bacteria in the water) but not necessarily the cause (how bacteria got there). A systematic investigation is needed:
- Well cap inspection. Is the cap tight, properly sealed, and vermin-proof? Cracks, missing gaskets, or gaps allow insects, surface water, and bacteria direct entry. This is the #1 cause of repeat contamination in our experience.
- Surface seal (annular grout) integrity. California requires a minimum of 50 feet of cement or bentonite seal around the well casing. In older wells (pre-1990 standards), the seal may be inadequate, deteriorated, or missing entirely. A failed surface seal allows surface water to migrate down the outside of the casing, carrying bacteria into the aquifer.
- Casing condition. Steel casings corrode over time, especially in aggressive (low pH or high chloride) water. A downhole camera inspection can reveal corrosion holes, failed joints, or cracks that allow contaminated water from shallow formations to enter.
- Wellhead drainage. The ground surface around the wellhead should slope away from the casing in all directions. Ponding water near the wellhead is a common contamination pathway.
- Proximity to contamination sources. In California, minimum setback distances are: 50 feet from a septic tank, 100 feet from a leach field, 100 feet from a sewer line, and 50 feet from animal pens. If your well doesn't meet these distances, contamination risk is elevated.
Persistent Iron Bacteria
Iron bacteria are notoriously resistant to standard shock chlorination because their biofilm shields the colony. If you're dealing with persistent iron bacteria:
- Increase chlorine concentration to 500–1,000 ppm and extend contact time to 48 hours
- Physical well rehabilitation — wire brushing, high-pressure jetting, or surging — physically removes biofilm and mineral encrustation, exposing bacteria to the chlorine
- Chemical rehabilitation — acid treatment (phosphoric or hydrochloric acid) followed by chlorination can dissolve the iron and mineral matrix that bacteria colonize. This must be done by a licensed professional.
- Continuous chlorination system — for wells with endemic iron bacteria, ongoing low-level chlorine injection (1–3 ppm maintained at the wellhead) prevents recolonization
When to Call a Professional
- Bacteria has returned after two or more shock chlorination attempts
- You don't know your well's depth, casing diameter, or construction details
- You suspect casing damage or seal failure
- You're dealing with iron bacteria, sulfur bacteria, or heavy biofilm buildup
- Your well is low-yield (under 3 GPM) and you're concerned about pump damage during flushing
- The county health department has issued a notice about your well's water quality
- You simply want the job done right, documented, and verified with lab testing
When Your Well Needs More Than Chlorination
Sometimes a well's problems go beyond what shock chlorination can address. Well rehabilitation — a more intensive process that restores a well's capacity and water quality — may be needed when:
Signs You Need Well Rehabilitation
- Declining yield: Your well used to produce 15 GPM but now only puts out 5 GPM. Mineral encrustation and biofilm buildup on the well screen progressively reduce flow.
- Increasing sediment: Sand, silt, or mineral particles appearing in your water that weren't there before. This can indicate screen failure or casing deterioration.
- Persistent bacteria after multiple treatments: If shock chlorination keeps failing, the contamination source may be deep within the well structure where simple chlorination can't reach.
- Pump cycling more frequently: Reduced well yield means the pump draws down water faster, triggering more frequent start-stop cycles that shorten pump life.
What Well Rehabilitation Involves
Professional well rehabilitation is a multi-step process that typically includes:
- Downhole video inspection to assess casing condition, screen condition, and identify the specific problems
- Mechanical cleaning — wire brushing the casing and screen to remove encrustation and biofilm
- Chemical treatment — acid treatment (usually phosphoric or muriatic acid) to dissolve mineral deposits, followed by neutralization
- High-volume surging or air-lifting to remove dislodged material from the well
- Shock chlorination as the final step to disinfect the cleaned well
- Pump testing to verify improved yield
- Water quality testing to confirm bacteriological safety
Well rehabilitation costs more than simple shock chlorination ($2,000–$5,000+ depending on well depth and severity of problems), but it can extend the life of a well by many years and restore it to near-original performance — far less expensive than drilling a new well at $15,000–$50,000+.
We use Hach and LaMotte professional water testing equipment for field analysis, with comprehensive lab testing through certified California laboratories.
Frequently Asked Questions
How much bleach do I need to shock my well?
Use approximately 2 gallons of unscented household bleach (8.25% sodium hypochlorite) per 100 gallons of water in your well system. For a typical San Diego County residential well — 6-inch casing, 150 feet of standing water, plus pressure tank and water heater — you'll need roughly 6–8 gallons of bleach. Always round up rather than down. The total cost in supplies is typically under $20.
How long does the entire process take?
Plan for your well to be out of service for 24–48 hours total. The active work (preparation, adding chlorine, recirculation, running faucets) takes 2–3 hours. Contact time is 12–24 hours (overnight works well). Flushing takes 1–4 hours depending on well flow rate. We recommend starting mid-afternoon and flushing the following morning.
Will shock chlorination damage my pump, pipes, or well?
No. At the concentrations used for shock chlorination (100–200 ppm), chlorine is safe for steel and PVC well casings, submersible pumps, copper and PEX plumbing, and pressure tanks. However, you must bypass water softeners, carbon filters, and RO systems — chlorine will damage these components. Also turn off your water heater to protect the anode rod.
How often should I shock my well?
Only when a specific trigger requires it — positive bacteria test, after well work, after flooding, after extended non-use. Annual preventive treatment is reasonable for wells with a history of contamination or in high-risk areas, but it's not necessary if your annual bacteria test comes back clean.
Can I do this myself?
Yes, most homeowners can successfully perform shock chlorination if they know their well's basic specifications and follow the proper procedure. However, consider hiring a professional if bacteria keeps returning, you're dealing with iron bacteria, you don't know your well's depth or construction, or you need documented results for a real estate transaction or health department requirement.
How do I know if the treatment worked?
The only reliable way to confirm success is a laboratory water test. Wait 7–10 days after flushing, then collect a properly taken water sample and submit it for total coliform and E. coli testing at a certified lab. "The water looks/smells/tastes fine" is not a reliable indicator of bacteriological safety — many harmful bacteria produce no detectable change in water appearance, odor, or taste.
What if my well water test still shows bacteria after treatment?
If bacteria returns after one treatment, try again with a higher chlorine concentration and longer contact time. If bacteria returns after two treatments, it's time to investigate structural causes — damaged cap, failed seal, corroded casing. A professional well inspection with a downhole camera is the most efficient way to identify the problem. Don't keep repeating shock chlorination hoping for different results.
Is chlorinated flush water safe for my septic system?
No — direct the majority of your flush water through an outdoor spigot away from the septic system. High chlorine concentrations kill the beneficial bacteria in your septic tank that are essential for waste decomposition. Small amounts through indoor fixtures during final flushing are unlikely to cause significant harm, but avoid dumping large volumes down indoor drains.
Need Help with Well Disinfection?
We perform professional shock chlorination with proper testing before and after.
Related Articles
Continue learning about well maintenance and troubleshooting